
A Comprehensive Guide to Uninstalling Microsoft SQL Server
Related Articles: A Comprehensive Guide to Uninstalling Microsoft SQL Server
Introduction
In this auspicious occasion, we are delighted to delve into the intriguing topic related to A Comprehensive Guide to Uninstalling Microsoft SQL Server. Let’s weave interesting information and offer fresh perspectives to the readers.
Table of Content
A Comprehensive Guide to Uninstalling Microsoft SQL Server

While Microsoft SQL Server is a powerful and versatile database management system, situations arise where its removal becomes necessary. This could stem from various factors, such as upgrading to a newer version, transitioning to a different database system, or simply no longer requiring the software.
This guide provides a comprehensive and detailed explanation of the process for uninstalling Microsoft SQL Server, covering all essential aspects and addressing potential challenges. It aims to equip users with the knowledge and tools necessary to successfully remove SQL Server from their systems without encountering unforeseen issues.
Understanding the Importance of a Clean Uninstall
Properly uninstalling SQL Server is crucial for several reasons:
- System Stability: An incomplete removal can leave behind residual files and registry entries, potentially causing conflicts and instability in the operating system.
- Resource Optimization: Removing SQL Server frees up valuable disk space and system resources, enhancing overall performance.
- Security: Unwanted remnants of SQL Server can present security vulnerabilities, making the system susceptible to malicious attacks.
- Preparation for Reinstallation: A clean uninstall ensures a smooth and successful reinstallation of SQL Server or other software in the future.
Prerequisites for Uninstalling SQL Server
Before embarking on the uninstall process, it is essential to take the following steps:
- Backup Crucial Data: Ensure all critical data within SQL Server databases is backed up. This includes user data, system databases, and any other important files.
- Terminate Active Connections: Disconnect all active connections to SQL Server instances. This can be achieved by stopping all applications using the database and closing any open connections within SQL Server Management Studio.
- Identify Dependencies: Determine if any other applications or services rely on SQL Server. If so, consider alternative solutions or postpone the uninstall until dependencies are resolved.
- Review User Permissions: Verify that the user attempting the uninstall has sufficient administrative privileges.
Methods for Uninstalling SQL Server
There are two primary methods for uninstalling SQL Server:
-
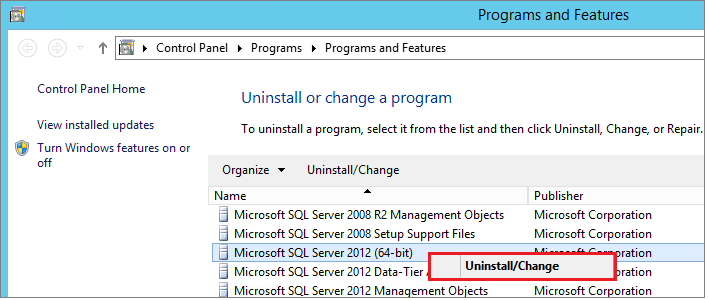
Using the Add or Remove Programs Control Panel: This method offers a simple and straightforward approach for removing SQL Server.
- Access the Control Panel.
- Navigate to "Programs and Features" (Windows 10/11) or "Programs" (Windows 7/8).
- Locate the "Microsoft SQL Server 20XX" entry (replace 20XX with the specific version number).
- Right-click on the entry and select "Uninstall/Change."
- Follow the on-screen prompts to complete the uninstallation process.
-
Utilizing the Setup Wizard: This method provides more granular control over the uninstall process, allowing users to select specific components to remove.
- Open the "Start" menu and search for "SQL Server Installation Center."
- Launch the "SQL Server Installation Center."
- Select "Uninstall" from the left-hand menu.
- Choose the "Remove" option.
- Select the specific SQL Server instance to uninstall.
- Follow the instructions provided by the setup wizard.
Addressing Common Challenges
During the uninstall process, users may encounter certain challenges. Here are some common issues and their resolutions:
- Error Messages: Encountering error messages during the uninstall process can be frustrating. Refer to the specific error message for troubleshooting steps. Consult Microsoft’s documentation or online resources for specific error codes.
- Dependencies: If other applications or services rely on SQL Server, the uninstall process may be blocked. Consider alternative solutions or temporarily disable these dependencies before proceeding.
- Locked Files: If files are in use by other applications or processes, the uninstall process may fail. Ensure all connections to SQL Server are closed and restart the computer before attempting the uninstall again.
- Registry Issues: Incorrect registry entries can hinder the uninstall process. Use a registry cleaner tool to remove any leftover entries related to SQL Server.
FAQs about Uninstalling SQL Server
Q: Can I uninstall SQL Server without losing my data?
A: No, uninstalling SQL Server will remove all data associated with the instance. Ensure you have a complete backup of all essential data before proceeding with the uninstall.
Q: Will uninstalling SQL Server affect other applications on my system?
A: If other applications rely on SQL Server, uninstalling it may cause functionality issues. Identify and address any dependencies before proceeding.
Q: Can I uninstall specific components of SQL Server?
A: Yes, using the Setup Wizard allows you to select specific components to remove. This can be useful if you only need to uninstall certain features or instances.
Q: What happens to my databases after uninstalling SQL Server?
A: The databases are removed along with the SQL Server instance. Ensure you have a backup of all critical data before uninstalling.
Q: How do I remove the SQL Server service from my system?
A: After uninstalling SQL Server, the service may still be present. Use the "Services" console (services.msc) to stop and disable the SQL Server service.
Tips for a Successful Uninstall
- Plan Ahead: Carefully plan the uninstall process by identifying dependencies, backing up data, and ensuring proper permissions.
- Consult Documentation: Refer to Microsoft’s official documentation for detailed instructions and troubleshooting tips.
- Use the Setup Wizard: Opt for the Setup Wizard method for more control and flexibility during the uninstall process.
- Restart Your Computer: After uninstalling SQL Server, restart your computer to ensure all residual files and processes are removed.
- Verify the Removal: After the uninstall process, check the "Programs and Features" control panel to confirm that SQL Server is no longer listed.
Conclusion
Successfully uninstalling Microsoft SQL Server requires a systematic and well-planned approach. By following the steps outlined in this guide, users can ensure a clean and complete removal of the software, avoiding potential issues and preparing their systems for future installations or upgrades.
Remember to prioritize data backup, address dependencies, and consult official documentation for specific instructions and troubleshooting guidance. A successful uninstall contributes to a stable, secure, and optimized system environment.


Closure
Thus, we hope this article has provided valuable insights into A Comprehensive Guide to Uninstalling Microsoft SQL Server. We thank you for taking the time to read this article. See you in our next article!